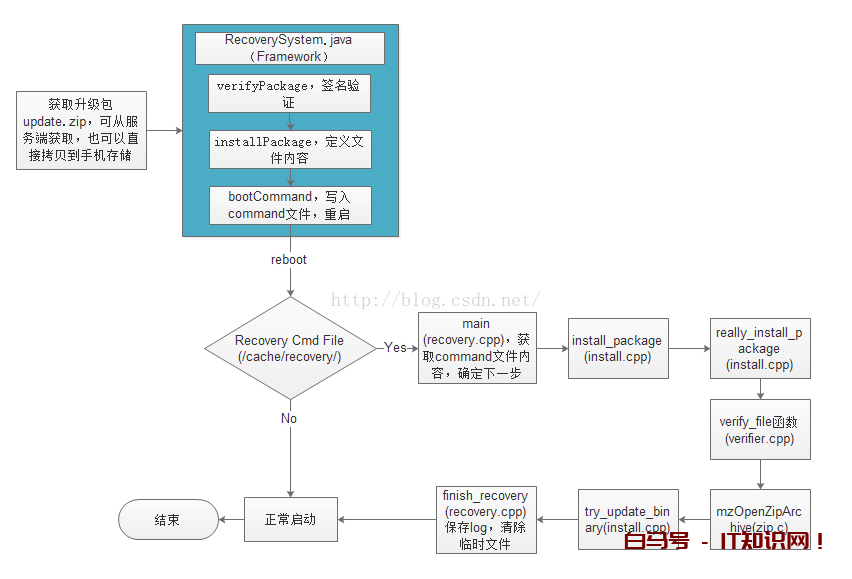
1、获取升级包,可以从服务端下载,也可以直接拷贝到SD卡中
2、获取升级包路径,验证签名,通过installPackage接口升级
3、系统重启进入Recovery模式
4、在install.cpp进行升级操作
5、try_update_binary执行升级脚本
6、finish_recovery,重启
一、获取升级包,可以从服务端下载,也可以直接拷贝到SD卡中
假设SD卡中已有升级包update.zip
二、获取升级包路径,验证签名,通过installPackage接口升级
1、调用RecoverySystem类提供的verifyPackage方法进行签名验证
public static void verifyPackage(File packageFile, ProgressListener listener, File deviceCertsZipFile) throws IOException, GeneralSecurityException签名验证函数,实现过程就不贴出来了,参数,
packageFile–升级文件
listener–进度监督器
deviceCertsZipFile–签名文件,如果为空,则使用系统默认的签名
只有当签名验证正确才返回,否则将抛出异常。
在Recovery模式下进行升级时候也是会进行签名验证的,如果这里先不进行验证也不会有什么问题。但是我们建议在重启前,先验证,以便及早发现问题。
如果签名验证没有问题,就执行installPackage开始升级。
2、installPackage开始升级
如果签名验证没有问题,就进行重启升级,
public static void installPackage(Context context, File packageFile) throws IOException { String filename = packageFile.getCanonicalPath(); Log.w(TAG, "!!! REBOOTING TO INSTALL " + filename + " !!!"); final String filenameArg = "--update_package=" + filename; final String localeArg = "--locale=" + Locale.getDefault().toString(); bootCommand(context, filenameArg, localeArg); }这里定义了两个参数,我们接着看,
private static void bootCommand(Context context, String... args) throws IOException { RECOVERY_DIR.mkdirs(); // In case we need it COMMAND_FILE.delete(); // In case it's not writable LOG_FILE.delete(); FileWriter command = new FileWriter(COMMAND_FILE); try { for (String arg : args) { if (!TextUtils.isEmpty(arg)) { command.write(arg); command.write("\n"); } } } finally { command.close(); } // Having written the command file, go ahead and reboot PowerManager pm = (PowerManager) context.getSystemService(Context.POWER_SERVICE); pm.reboot(PowerManager.REBOOT_RECOVERY); throw new IOException("Reboot failed (no permissions?)"); }创建目录/cache/recovery/,command文件保存在该目录下;如果存在command文件,将其删除;然后将上面一步生成的两个参数写入到command文件。
最后重启设备,重启过程就不再详述了。
三、系统重启进入Recovery模式
系统重启时会判断/cache/recovery目录下是否有command文件,如果存在就进入recovery模式,否则就正常启动。
进入到Recovery模式下,将执行recovery.cpp的main函数,下面贴出关键代码片段,
int arg; while ((arg = getopt_long(argc, argv, "", OPTIONS, NULL)) != -1) { switch (arg) { case 's': send_intent = optarg; break; case 'u': update_package = optarg; break; case 'w': wipe_data = wipe_cache = 1; break; case 'c': wipe_cache = 1; break; case 't': show_text = 1; break; case 'x': just_exit = true; break; case 'l': locale = optarg; break; case 'g': { if (stage == NULL || *stage == '\0') { char buffer[20] = "1/"; strncat(buffer, optarg, sizeof(buffer)-3); stage = strdup(buffer); } break; } case 'p': shutdown_after = true; break; case 'r': reason = optarg; break; case '?': LOGE("Invalid command argument\n"); continue; } } 这是一个While 循环,用来读取 recovery 的 command 参数, OPTIONS 的不同选项定义如下,
static const struct option OPTIONS[] = { { "send_intent", required_argument, NULL, 's' }, { "update_package", required_argument, NULL, 'u' }, { "wipe_data", no_argument, NULL, 'w' }, { "wipe_cache", no_argument, NULL, 'c' }, { "show_text", no_argument, NULL, 't' }, { "just_exit", no_argument, NULL, 'x' }, { "locale", required_argument, NULL, 'l' }, { "stages", required_argument, NULL, 'g' }, { "shutdown_after", no_argument, NULL, 'p' }, { "reason", required_argument, NULL, 'r' }, { NULL, 0, NULL, 0 },};显然,根据第二步写入的命令文件内容,将为update_package 赋值。
接着看,
if (update_package) { // For backwards compatibility on the cache partition only, if // we're given an old 'root' path "CACHE:foo", change it to // "/cache/foo". if (strncmp(update_package, "CACHE:", 6) == 0) { int len = strlen(update_package) + 10; char* modified_path = (char*)malloc(len); strlcpy(modified_path, "/cache/", len); strlcat(modified_path, update_package+6, len); printf("(replacing path \"%s\" with \"%s\")\n", update_package, modified_path); update_package = modified_path; } } 兼容性处理。
int status = INSTALL_SUCCESS; if (update_package != NULL) { status = install_package(update_package, &wipe_cache, TEMPORARY_INSTALL_FILE, true); if (status == INSTALL_SUCCESS && wipe_cache) { if (erase_volume("/cache")) { LOGE("Cache wipe (requested by package) failed."); } } if (status != INSTALL_SUCCESS) { ui->Print("Installation aborted.\n"); // If this is an eng or userdebug build, then automatically // turn the text display on if the script fails so the error // message is visible. char buffer[PROPERTY_VALUE_MAX+1]; property_get("ro.build.fingerprint", buffer, ""); if (strstr(buffer, ":userdebug/") || strstr(buffer, ":eng/")) { ui->ShowText(true); } } } else if (wipe_data) { if (device->WipeData()) status = INSTALL_ERROR; if (erase_volume("/data")) status = INSTALL_ERROR; if (wipe_cache && erase_volume("/cache")) status = INSTALL_ERROR; if (erase_persistent_partition() == -1 ) status = INSTALL_ERROR; if (status != INSTALL_SUCCESS) ui->Print("Data wipe failed.\n"); } else if (wipe_cache) { if (wipe_cache && erase_volume("/cache")) status = INSTALL_ERROR; if (status != INSTALL_SUCCESS) ui->Print("Cache wipe failed.\n"); } else if (!just_exit) { status = INSTALL_NONE; // No command specified ui->SetBackground(RecoveryUI::NO_COMMAND); }update_package不为空,执行install_package方法。
我们也可以看到擦除数据、缓存的实现也是在这个里执行的,这里就不展开了。
四、在install.cpp进行升级操作
具体的升级过程都是在install.cpp中执行的,先看install_package方法,
intinstall_package(const char* path, int* wipe_cache, const char* install_file, bool needs_mount){ FILE* install_log = fopen_path(install_file, "w"); if (install_log) { fputs(path, install_log); fputc('\n', install_log); } else { LOGE("failed to open last_install: %s\n", strerror(errno)); } int result; if (setup_install_mounts() != 0) { LOGE("failed to set up expected mounts for install; aborting\n"); result = INSTALL_ERROR; } else { result = really_install_package(path, wipe_cache, needs_mount); } if (install_log) { fputc(result == INSTALL_SUCCESS ? '1' : '0', install_log); fputc('\n', install_log); fclose(install_log); } return result;} 这个方法中首先创建了log文件,升级过程包括出错的信息都会写到这个文件中,便于后续的分析工作。继续跟进, really_install_package,
static intreally_install_package(const char *path, int* wipe_cache, bool needs_mount){ ui->SetBackground(RecoveryUI::INSTALLING_UPDATE); ui->Print("Finding update package...\n"); // Give verification half the progress bar... ui->SetProgressType(RecoveryUI::DETERMINATE); ui->ShowProgress(VERIFICATION_PROGRESS_FRACTION, VERIFICATION_PROGRESS_TIME); LOGI("Update location: %s\n", path); // Map the update package into memory. ui->Print("Opening update package...\n"); if (path && needs_mount) { if (path[0] == '@') { ensure_path_mounted(path+1); } else { ensure_path_mounted(path); } } MemMapping map; if (sysMapFile(path, &map) != 0) { LOGE("failed to map file\n"); return INSTALL_CORRUPT; } // 装入签名文件 int numKeys; Certificate* loadedKeys = load_keys(PUBLIC_KEYS_FILE, &numKeys); if (loadedKeys == NULL) { LOGE("Failed to load keys\n"); return INSTALL_CORRUPT; } LOGI("%d key(s) loaded from %s\n", numKeys, PUBLIC_KEYS_FILE); ui->Print("Verifying update package...\n"); // 验证签名 int err; err = verify_file(map.addr, map.length, loadedKeys, numKeys); free(loadedKeys); LOGI("verify_file returned %d\n", err); // 签名失败的处理 if (err != VERIFY_SUCCESS) { LOGE("signature verification failed\n"); sysReleaseMap(&map); return INSTALL_CORRUPT; } /* Try to open the package. */ // 打开升级包 ZipArchive zip; err = mzOpenZipArchive(map.addr, map.length, &zip); if (err != 0) { LOGE("Can't open %s\n(%s)\n", path, err != -1 ? strerror(err) : "bad"); sysReleaseMap(&map); return INSTALL_CORRUPT; } /* Verify and install the contents of the package. */ ui->Print("Installing update...\n"); ui->SetEnableReboot(false); // 执行升级脚本文件,开始升级 int result = try_update_binary(path, &zip, wipe_cache); ui->SetEnableReboot(true); ui->Print("\n"); sysReleaseMap(&map); return result;}该方法主要做了三件事
1、验证签名
int numKeys; Certificate* loadedKeys = load_keys(PUBLIC_KEYS_FILE, &numKeys); if (loadedKeys == NULL) { LOGE("Failed to load keys\n"); return INSTALL_CORRUPT; } 装载签名文件,如果为空 ,终止升级;
int err; err = verify_file(map.addr, map.length, loadedKeys, numKeys); free(loadedKeys); LOGI("verify_file returned %d\n", err); // 签名失败的处理 if (err != VERIFY_SUCCESS) { LOGE("signature verification failed\n"); sysReleaseMap(&map); return INSTALL_CORRUPT; }调用verify_file进行签名验证,这个方法定义在verifier.cpp文件中,此处不展开,如果验证失败立即终止升级。
2、读取升级包信息
ZipArchive zip; err = mzOpenZipArchive(map.addr, map.length, &zip); if (err != 0) { LOGE("Can't open %s\n(%s)\n", path, err != -1 ? strerror(err) : "bad"); sysReleaseMap(&map); return INSTALL_CORRUPT; } 执行mzOpenZipArchive方法,打开升级包并扫描,将包的内容拷贝到变量zip中,该变量将作为参数用来执行升级脚本。
3、执行升级脚本文件,开始升级
int result = try_update_binary(path, &zip, wipe_cache); try_update_binary方法用来处理升级包,执行制作升级包中的脚本文件 update_binary ,进行系统更新。
五、try_update_binary执行升级脚本
// If the package contains an update binary, extract it and run it.static inttry_update_binary(const char *path, ZipArchive *zip, int* wipe_cache) { // 检查update-binary是否存在 const ZipEntry* binary_entry = mzFindZipEntry(zip, ASSUMED_UPDATE_BINARY_NAME); if (binary_entry == NULL) { mzCloseZipArchive(zip); return INSTALL_CORRUPT; } const char* binary = "/tmp/update_binary"; unlink(binary); int fd = creat(binary, 0755); if (fd < 0) { mzCloseZipArchive(zip); LOGE("Can't make %s\n", binary); return INSTALL_ERROR; } // update-binary拷贝到"/tmp/update_binary" bool ok = mzExtractZipEntryToFile(zip, binary_entry, fd); close(fd); mzCloseZipArchive(zip); if (!ok) { LOGE("Can't copy %s\n", ASSUMED_UPDATE_BINARY_NAME); return INSTALL_ERROR; } // 创建管道,用于下面的子进程和父进程之间的通信 int pipefd[2]; pipe(pipefd); // When executing the update binary contained in the package, the // arguments passed are: // // - the version number for this interface // // - an fd to which the program can write in order to update the // progress bar. The program can write single-line commands: // // progress <frac> <secs> // fill up the next <frac> part of of the progress bar // over <secs> seconds. If <secs> is zero, use // set_progress commands to manually control the // progress of this segment of the bar // // set_progress <frac> // <frac> should be between 0.0 and 1.0; sets the // progress bar within the segment defined by the most // recent progress command. // // firmware <"hboot"|"radio"> <filename> // arrange to install the contents of <filename> in the // given partition on reboot. // // (API v2: <filename> may start with "PACKAGE:" to // indicate taking a file from the OTA package.) // // (API v3: this command no longer exists.) // // ui_print <string> // display <string> on the screen. // // - the name of the package zip file. // const char** args = (const char**)malloc(sizeof(char*) * 5); args[0] = binary; args[1] = EXPAND(RECOVERY_API_VERSION); // defined in Android.mk char* temp = (char*)malloc(10); sprintf(temp, "%d", pipefd[1]); args[2] = temp; args[3] = (char*)path; args[4] = NULL; // 创建子进程。负责执行binary脚本 pid_t pid = fork(); if (pid == 0) { umask(022); close(pipefd[0]); execv(binary, (char* const*)args);// 执行binary脚本 fprintf(stdout, "E:Can't run %s (%s)\n", binary, strerror(errno)); _exit(-1); } close(pipefd[1]); *wipe_cache = 0; // 父进程负责接受子进程发送的命令去更新ui显示 char buffer[1024]; FILE* from_child = fdopen(pipefd[0], "r"); while (fgets(buffer, sizeof(buffer), from_child) != NULL) { char* command = strtok(buffer, " \n"); if (command == NULL) { continue; } else if (strcmp(command, "progress") == 0) { char* fraction_s = strtok(NULL, " \n"); char* seconds_s = strtok(NULL, " \n"); float fraction = strtof(fraction_s, NULL); int seconds = strtol(seconds_s, NULL, 10); ui->ShowProgress(fraction * (1-VERIFICATION_PROGRESS_FRACTION), seconds); } else if (strcmp(command, "set_progress") == 0) { char* fraction_s = strtok(NULL, " \n"); float fraction = strtof(fraction_s, NULL); ui->SetProgress(fraction); } else if (strcmp(command, "ui_print") == 0) { char* str = strtok(NULL, "\n"); if (str) { ui->Print("%s", str); } else { ui->Print("\n"); } fflush(stdout); } else if (strcmp(command, "wipe_cache") == 0) { *wipe_cache = 1; } else if (strcmp(command, "clear_display") == 0) { ui->SetBackground(RecoveryUI::NONE); } else if (strcmp(command, "enable_reboot") == 0) { // packages can explicitly request that they want the user // to be able to reboot during installation (useful for // debugging packages that don't exit). ui->SetEnableReboot(true); } else { LOGE("unknown command [%s]\n", command); } } fclose(from_child); int status; waitpid(pid, &status, 0); if (!WIFEXITED(status) || WEXITSTATUS(status) != 0) { LOGE("Error in %s\n(Status %d)\n", path, WEXITSTATUS(status)); return INSTALL_ERROR; } return INSTALL_SUCCESS;} try_update_binary函数,是真正实现读取升级包中的脚本文件并执行相应的函数的地方。 在此函数中,通过调用fork函数创建出一个子进程,在子进程中开始读取并执行升级脚本文件。在此需要注意的是函数fork的用法,fork被调用一次,将做两次返回,在父进程中返回的是子进程的进程ID,为正数;而在子进程中,则返回0。子进程创建成功后,开始执行升级代码,并通过管道与父进程交互,父进程则通过读取子进程传递过来的信息更新UI。
六、finish_recovery,重启
上一步完成之后,回到main函数,
// Save logs and clean up before rebooting or shutting down. finish_recovery(send_intent);保存升级过程中的log,清除临时文件,包括command文件(不清除的话,下次重启还会进入recovery模式),最后重启。
以上就是升级的一个流程。

补充:
手动升级的流程也基本差不多,通过power key + volume上键组合,进入recovery模式,进入prompt_and_wait函数等待用户按键事件。
recovery.cpp的main函数,
Device::BuiltinAction after = shutdown_after ? Device::SHUTDOWN : Device::REBOOT; if (status != INSTALL_SUCCESS || ui->IsTextVisible()) { Device::BuiltinAction temp = prompt_and_wait(device, status); if (temp != Device::NO_ACTION) after = temp; } 根据用户选择进入到相应的分支进行处理,如下图,
int chosen_item = get_menu_selection(headers, device->GetMenuItems(), 0, 0, device); // device-specific code may take some action here. It may // return one of the core actions handled in the switch // statement below. Device::BuiltinAction chosen_action = device->InvokeMenuItem(chosen_item);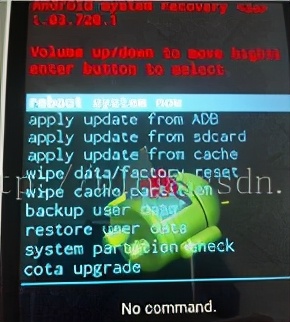
当我们选择从外置 sdcard 升级,进入如下分支中,
case Device::APPLY_EXT: { ensure_path_mounted(SDCARD_ROOT); char* path = browse_directory(SDCARD_ROOT, device); if (path == NULL) { ui->Print("\n-- No package file selected.\n", path); break; } ui->Print("\n-- Install %s ...\n", path); set_sdcard_update_bootloader_message(); void* token = start_sdcard_fuse(path); int status = install_package(FUSE_SIDELOAD_HOST_PATHNAME, &wipe_cache, TEMPORARY_INSTALL_FILE, false); finish_sdcard_fuse(token); ensure_path_unmounted(SDCARD_ROOT); if (status == INSTALL_SUCCESS && wipe_cache) { ui->Print("\n-- Wiping cache (at package request)...\n"); if (erase_volume("/cache")) { ui->Print("Cache wipe failed.\n"); } else { ui->Print("Cache wipe complete.\n"); } } if (status >= 0) { if (status != INSTALL_SUCCESS) { ui->SetBackground(RecoveryUI::ERROR); ui->Print("Installation aborted.\n"); } else if (!ui->IsTextVisible()) { return Device::NO_ACTION; // reboot if logs aren't visible } else { ui->Print("\nInstall from sdcard complete.\n"); } } break; }char* path = browse_directory(SDCARD_ROOT, device); 这个函数浏览 SD card 下的文件 , 并把路径记录下来 , 然后根据名称排序 , 并处理用户按键。
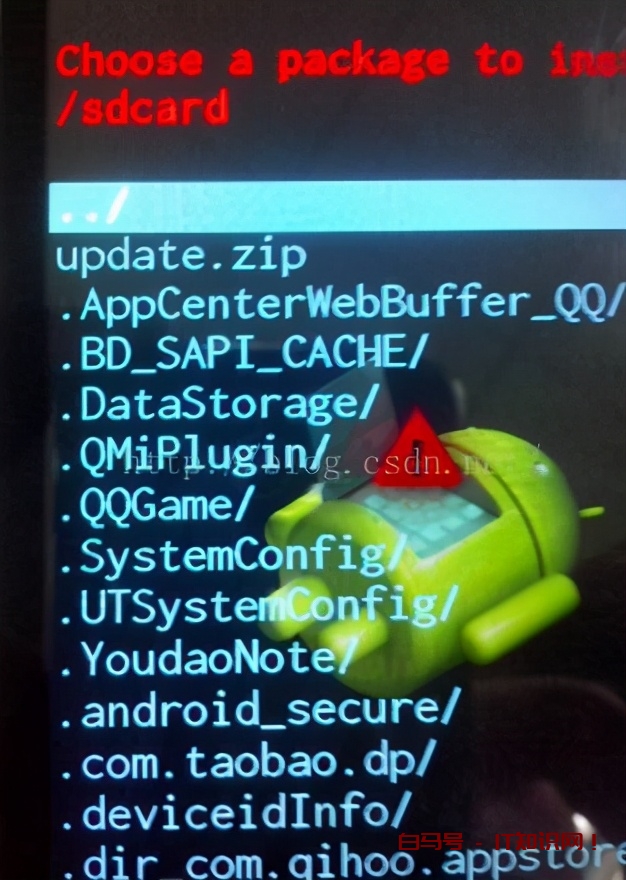
·当用户选择第一个条目“../”,直接跳转到上级目录,并且继续浏览文件
·当用户选择的条目以“/”开头,直接进入子目录
·其它情况表明,该条目就是zip包.写入BCB,copy 更新包至临时目录,直接转入install_package
选择zip包后,同样也是执行install_package函数,后面与自动升级的流程是一样的。
int status = install_package(FUSE_SIDELOAD_HOST_PATHNAME, &wipe_cache, TEMPORARY_INSTALL_FILE, false);声明:所有白马号原创内容,未经允许禁止任何网站及个人转载、采集等一切非法引用。本站已启用原创保护,有法律保护作用,否则白马号保留一切追究的权利。发布者:白马号,转转请注明出处:https://www.bmhysw.com/article/9012.html
 微信扫一扫
微信扫一扫  支付宝扫一扫